
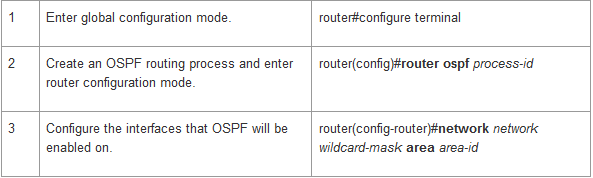
I'll try to explain OSPF configuration on cisco devices for beginner level engineer. For this case, Cisco Packet Tracer will be our only required tool which we'll use like lab.
In my opinion, OSPF basic configuration is very simple for new graduated engineers. Firtsly, you need to enable ospf on a router by "router ospf PROCESS-ID" at global config mode. Next, you should decide interface which you will use ospf and what network will be advertised. You can execute "IP_ADDRESS WILCARD_MASK AREA_ID"command to do this required.
There is a important point for this case, the ospf process_id does not have to be same on all routers to establish a neighbor, but area_id have to be same on all neighbor routers in order to become neighbors.
First, we need to enable OSPF on both routers. Then we need to define what network will be advertised into OSPF. This can be done by using the fallowing commands for both devices;

To verify ospf configuration, we can execute "show ip route ospf" command like below and check output which starts with 'O':
NWOPERASYON_TESTASR1002#show ip route ospf
173.16.0.0/30 is subnetted, 1 subnets
C 173.16.51.0 is directly connected, Serial2/0
C 192.168.1.0/24 is directly connected, FastEthernet0/0
O E2 192.168.2.0/24 [110/20]
via 173.16.51.2, 00:36:34, Serial2/0
O E2 192.168.3.0/24 [110/20]
via 173.16.51.2, 00:36:34, Serial2/0
router ospf 1
log-adjacency-changes
redistribute connected
network 173.16.51.1 0.0.0.0 area 0
This output for other router:
NWOPERASYON_TEST901#show ip route ospf
173.16.0.0/30 is subnetted, 1 subnets
C 173.16.51.0 is directly connected, Serial2/0
O E2 192.168.1.0/24 [110/20]
via 173.16.51.1, 00:23:32, Serial2/0
C 192.168.2.0/24 is directly connected, FastEthernet0/0.1
C 192.168.3.0/24 is directly connected, FastEthernet0/0.2
on interface:
router ospf 1
log-adjacency-changes
redistribute connected
network 173.16.51.2 0.0.0.0 area 0
Note: You can see in output of "show ip route
ospf" E2 - E1 type after the 'O'.
It means;
E2 > type 2 > metric is 20 in default and never
change.
E1 > type 1 > admin can managed metrics so it
can affect the trafic. Type 2 is usable for network topology which have many
ABRs(area border router) and in more than one ospf area.
Hopefully the content of this article will get you started
in understanding of basic OSPF configuration. Take the concepts shown in this
article and test them in a lab like cisco packet tracer. Once these concepts
have been tested and understood it.
Please do not hesitate to ask any question about ospf with using my e-mail.
No comments:
Post a Comment